Unleashing the Power of Collaborative AI
Imagine having a team of specialized AI agents working together seamlessly to solve complex problems, each contributing their unique skills to achieve a common goal. This is the power of CrewAI - a framework that enables you to create collaborative AI systems that can accomplish tasks far beyond what a single AI could achieve alone. In this guide, we’ll walk through creating a research crew that will help us research and analyze a topic, then create a comprehensive report. This practical example demonstrates how AI agents can collaborate to accomplish complex tasks, but it’s just the beginning of what’s possible with CrewAI.What You’ll Build and Learn
By the end of this guide, you’ll have:- Created a specialized AI research team with distinct roles and responsibilities
- Orchestrated collaboration between multiple AI agents
- Automated a complex workflow that involves gathering information, analysis, and report generation
- Built foundational skills that you can apply to more ambitious projects
- Multi-stage content creation with specialized writers, editors, and fact-checkers
- Complex customer service systems with tiered support agents
- Autonomous business analysts that gather data, create visualizations, and generate insights
- Product development teams that ideate, design, and plan implementation
Prerequisites
Before starting, make sure you have:- Installed CrewAI following the installation guide
- Set up your LLM API key in your environment, following the LLM setup guide
- Basic understanding of Python
Step 1: Create a New CrewAI Project
First, let’s create a new CrewAI project using the CLI. This command will set up a complete project structure with all the necessary files, allowing you to focus on defining your agents and their tasks rather than setting up boilerplate code.- A project directory with the necessary files
- Configuration files for agents and tasks
- A basic crew implementation
- A main script to run the crew
Step 2: Explore the Project Structure
Let’s take a moment to understand the project structure created by the CLI. CrewAI follows best practices for Python projects, making it easy to maintain and extend your code as your crews become more complex.Step 3: Configure Your Agents
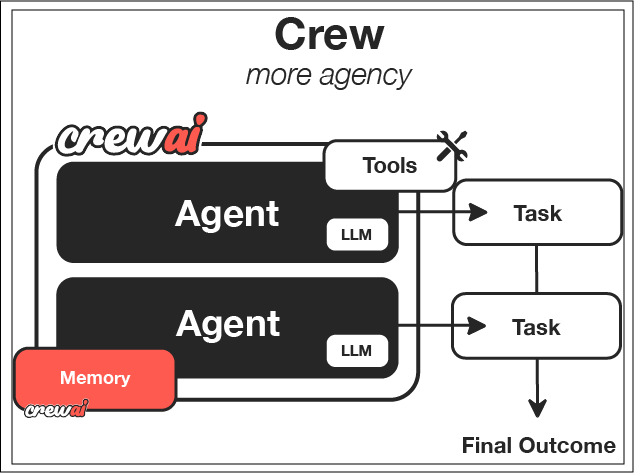
Now comes the fun part - defining your AI agents! In CrewAI, agents are specialized entities with specific roles, goals, and backstories that shape their behavior. Think of them as characters in a play, each with their own personality and purpose. For our research crew, we’ll create two agents:- A researcher who excels at finding and organizing information
- An analyst who can interpret research findings and create insightful reports
agents.yaml file to define these specialized agents. Be sure
to set llm to the provider you are using.
Step 4: Define Your Tasks
With our agents defined, we now need to give them specific tasks to perform. Tasks in CrewAI represent the concrete work that agents will perform, with detailed instructions and expected outputs. For our research crew, we’ll define two main tasks:- A research task for gathering comprehensive information
- An analysis task for creating an insightful report
tasks.yaml file:
context field in the analysis task - this is a powerful feature that allows the analyst to access the output of the research task. This creates a workflow where information flows naturally between agents, just as it would in a human team.
Step 5: Configure Your Crew
Now it’s time to bring everything together by configuring our crew. The crew is the container that orchestrates how agents work together to complete tasks. Let’s modify thecrew.py file:
- Creating the researcher agent and equipping it with the SerperDevTool to search the web
- Creating the analyst agent
- Setting up the research and analysis tasks
- Configuring the crew to run tasks sequentially (the analyst will wait for the researcher to finish)
Step 6: Set Up Your Main Script
Now, let’s set up the main script that will run our crew. This is where we provide the specific topic we want our crew to research.Step 7: Set Up Your Environment Variables
Create a.env file in your project root with your API keys:
Step 8: Install Dependencies
Install the required dependencies using the CrewAI CLI:- Read the dependencies from your project configuration
- Create a virtual environment if needed
- Install all required packages
Step 9: Run Your Crew
Now for the exciting moment - it’s time to run your crew and see AI collaboration in action!Step 10: Review the Output
Once the crew completes its work, you’ll find the final report in theoutput/report.md file. The report will include:
- An executive summary
- Detailed information about the topic
- Analysis and insights
- Recommendations or future considerations
Exploring Other CLI Commands
CrewAI offers several other useful CLI commands for working with crews:The Art of the Possible: Beyond Your First Crew
What you’ve built in this guide is just the beginning. The skills and patterns you’ve learned can be applied to create increasingly sophisticated AI systems. Here are some ways you could extend this basic research crew:Expanding Your Crew
You could add more specialized agents to your crew:- A fact-checker to verify research findings
- A data visualizer to create charts and graphs
- A domain expert with specialized knowledge in a particular area
- A critic to identify weaknesses in the analysis
Adding Tools and Capabilities
You could enhance your agents with additional tools:- Web browsing tools for real-time research
- CSV/database tools for data analysis
- Code execution tools for data processing
- API connections to external services
Creating More Complex Workflows
You could implement more sophisticated processes:- Hierarchical processes where manager agents delegate to worker agents
- Iterative processes with feedback loops for refinement
- Parallel processes where multiple agents work simultaneously
- Dynamic processes that adapt based on intermediate results
Applying to Different Domains
The same patterns can be applied to create crews for:- Content creation: Writers, editors, fact-checkers, and designers working together
- Customer service: Triage agents, specialists, and quality control working together
- Product development: Researchers, designers, and planners collaborating
- Data analysis: Data collectors, analysts, and visualization specialists
Next Steps
Now that you’ve built your first crew, you can:- Experiment with different agent configurations and personalities
- Try more complex task structures and workflows
- Implement custom tools to give your agents new capabilities
- Apply your crew to different topics or problem domains
- Explore CrewAI Flows for more advanced workflows with procedural programming
Congratulations! You’ve successfully built your first CrewAI crew that can research and analyze any topic you provide. This foundational experience has equipped you with the skills to create increasingly sophisticated AI systems that can tackle complex, multi-stage problems through collaborative intelligence.